New Lesson Platform
Launching!
Tutor Instructions!
We have put together the following to help you navigate around the new teaching platform which will completely replace Zoom from Tuesday, March 19th. We will be contacting our students with instructions in the coming weeks, so please do not try to use it with students yet or tell them about it.
We will be custom building on this platform over the coming months, and it will eventually replace TutorBird, keeping everything in one, simple platform which will reduce your admin time, and increase lesson engagement.
We’re confident you’ll find the new platform more engaging and effective. Through thorough testing, we’ve tailored it to meet your educational needs brilliantly, and are excited for you to try it!
Please note, this is currently only replacing Zoom. We will still book lessons and complete lesson notes in Tutorbird for now.
Feel free to get a feel for the lesson space, the resources, and we will be hosting multiple ‘Tutor Drop-in Sessions’ over the coming weeks to demonstrate and talk about how you are finding it. Please try to attend these sessions.
We know you will love the new platform, and from our extensive testing, it really works very well.
STEP 1:
Go to https://my.pencilapp.com and you can either log in with:
- Your NLG email – it must be your NLG email for you to be added to our account.
- or login with Microsoft – this will use your NLG email account and password (please ensure that you are logged into your work email on your browser before choosing this option).

STEP 2:
Once logged in, you will see your ‘Spaces’. We have created this for you – you DO NOT need to create anything else here. Please ignore the list on the left – We will not be using ‘Schedule’ until later in the year. Lessons will still be scheduled in TutorBird for now.
You tutor can send you a message to you if running late, and when the lesson starts, you will automatically be moved into the lesson space.

STEP 3:
Click ‘Enter’ – This will take you to your ‘Waiting Room’ Space. This is the space that your students will arrive in and see before every lesson.
STEP 4:
Please DO NOT click the padlock – this space is locked for the students, so waiting students can’t delete the image or write on the space. We need to keep it like this, so all students are consistently greeted with the same screen.
From here, click ‘Boards’ (bottom left), then select ‘Manage Rooms’
(You can also click the ‘Main Room’ wording at the top left of the space, and then ‘Switch Rooms’ which does the same thing.
This brings you to your Rooms Overview:
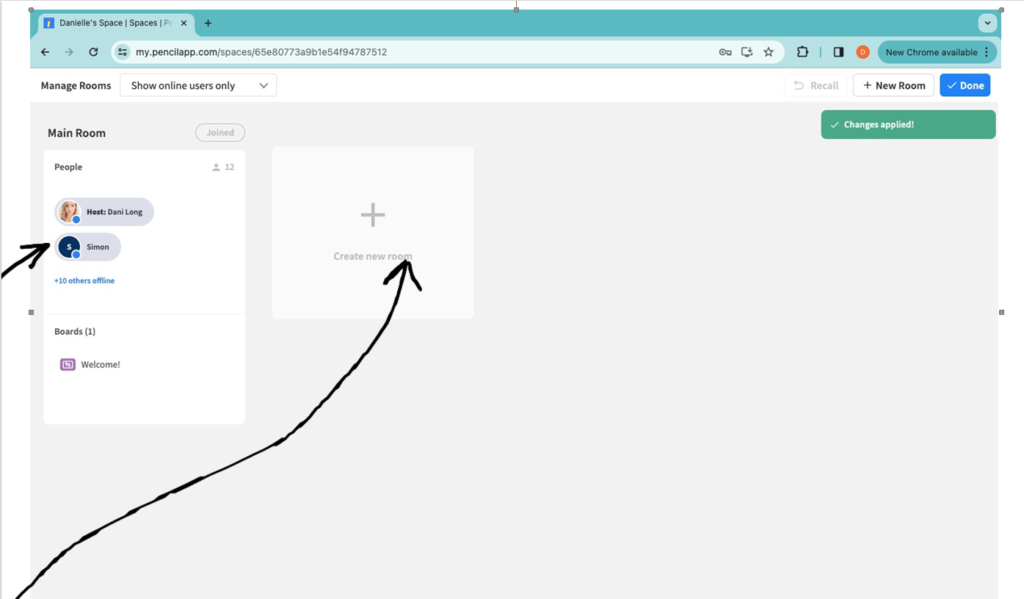
STEP 5:
For each lesson, you will create a new room for that specific student and lesson. Click the + ‘Create Room’ icon, and name the room for your next student.
We suggest ‘Student name, Subject’ eg ‘Simon’s Maths Lesson’
Once the student has clicked the lesson link, or logs in, they will land in the waiting room you saw in Step 3.
You can see they have arrived by their icon appearing in the main room. You can see in the image that Simon has entered the waiting room.
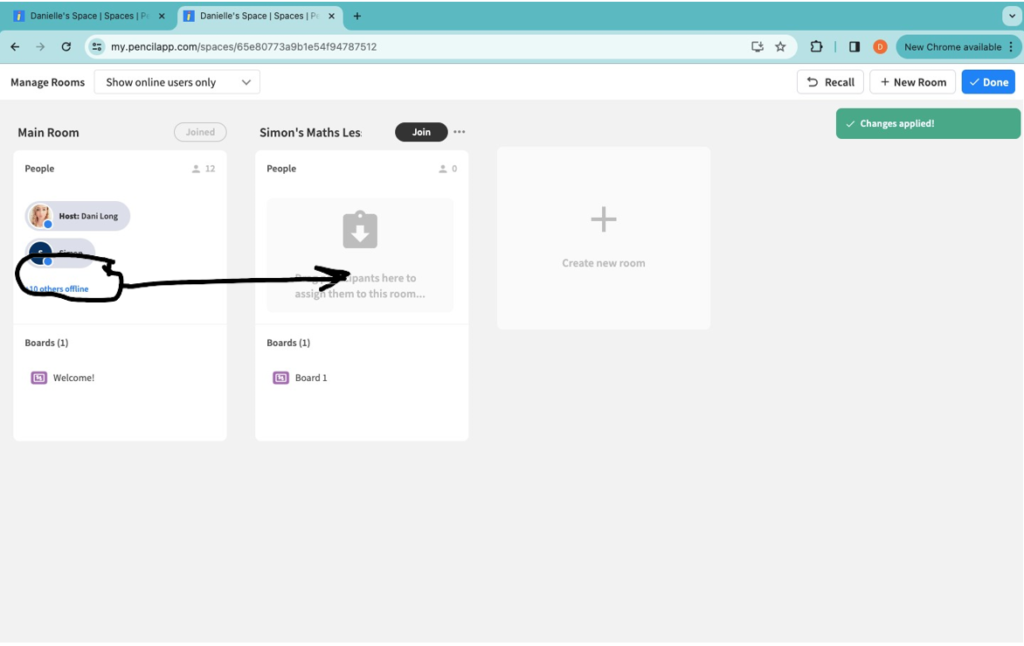
STEP 6:
Click, hold and drag the students name over from the Main Room, into their new Lesson Space. You can also right click on the student name and ‘Move To Room’
Once you have done this, the student will be moved into the lesson room. They can either click to accept and move instantly, or after 20 seconds they are moved automatically. You are both now in the lesson space!
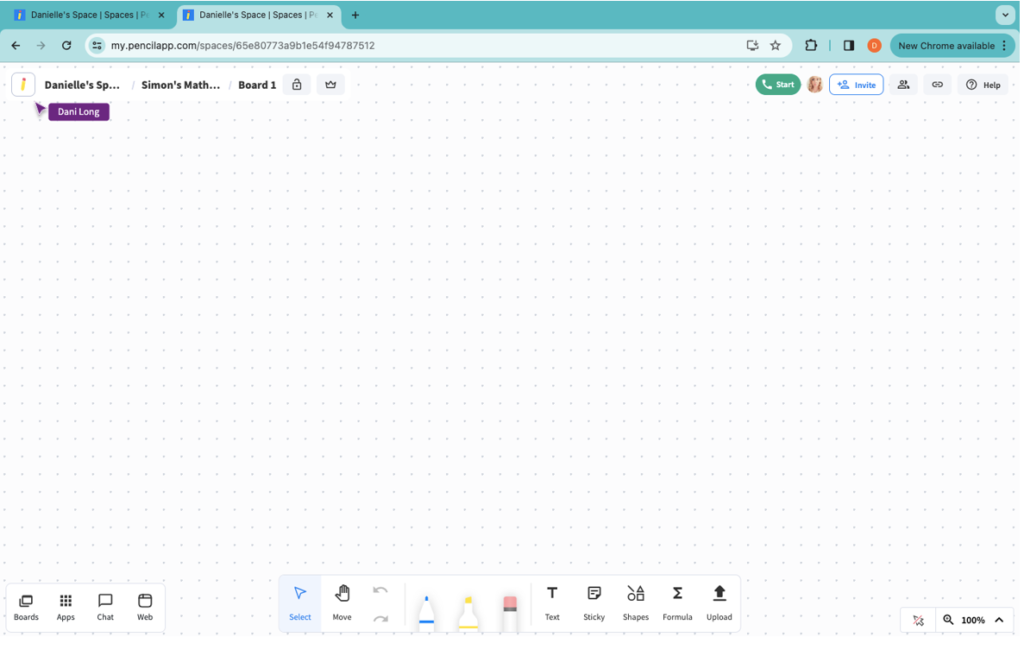
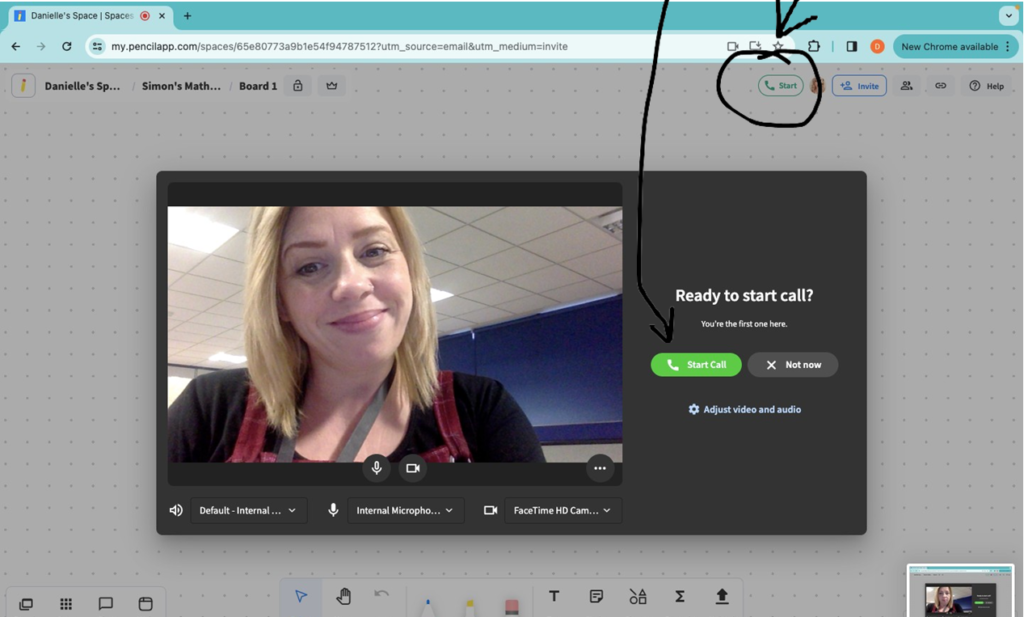
STEP 7:
We now need to start the call to see and speak to the student. Click the Green Start button at the top of the workspace. It will then ask you if you are ready to start the call, check your camera is working, and click ‘Start Call.’
All lessons are automatically recorded.
STEP 8:
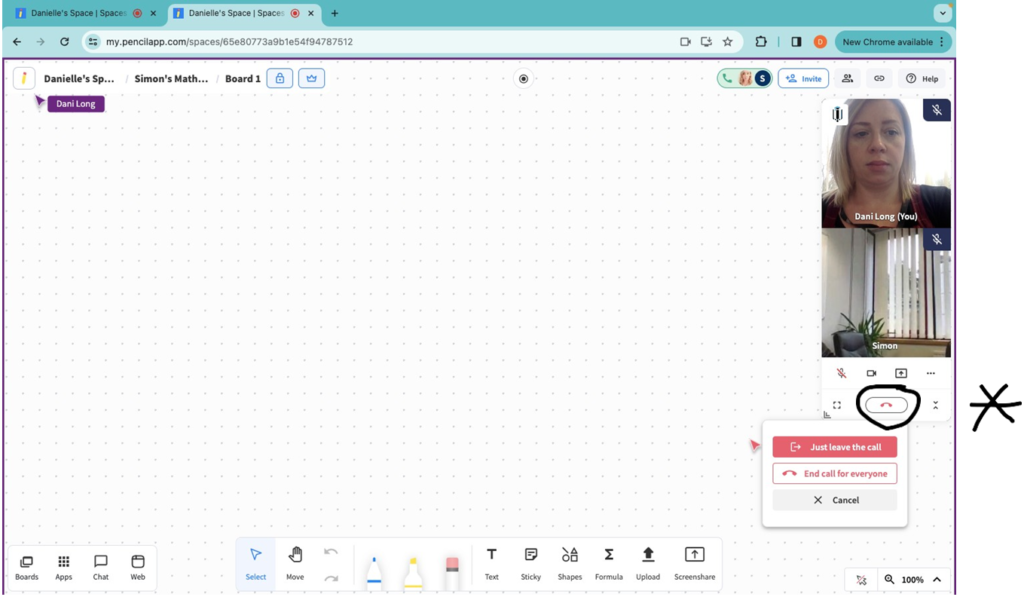
Once your lesson is over, press the red Hang-up icon below the videos. Select ‘End call for everyone’ – this will end the call and the lesson for both the tutor and the student.
We need to return to the ‘Rooms Overview’, like we did in Step 4: Click Boards, then select ‘Manage Rooms’
(You can also click the ‘Main Room’ wording at the top, and then ‘Switch Rooms’ which does the same thing.
This then takes you back to your Rooms Overview.
STEP 9:
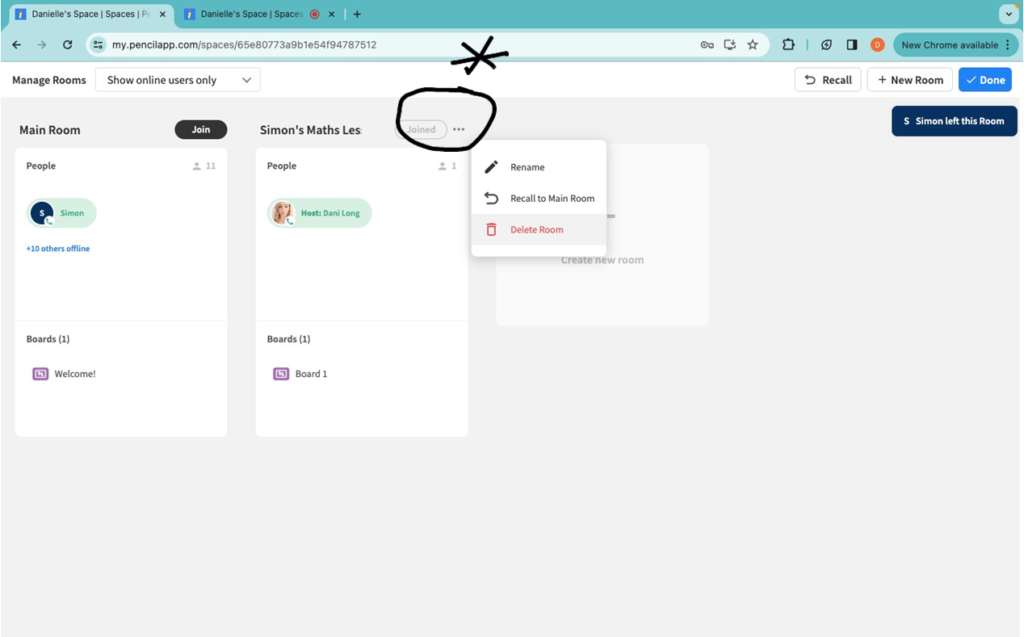
We now need to delete the lesson space we just used, and make a new one for the next lesson. Click the 3 dots at the top of the lesson space, the ‘Delete Room.’ Once you have done this, go back to ‘Step 5’ and create the room for your next student.
Once you have done these steps a few times, it is very quick, and works very well.
IMPORTANT POINTS
Please delete the boards after use. It is tempting to create a board for each student and re-use them for every lesson, however due to the way that data is stored and cached, this will make your computer run very slowly. We are working on this for the long term.
If you accidentally delete the Waiting Room image, please call us and we can support you – 01434 239069 and ask for Michael. Please try not to do this!
LEADER MODE
(Crown Icon at the top of the lesson space)
When this is on, your student cannot write, draw or move around the screen. You are the ‘leader’ so whatever you are looking at, or wherever you scroll, the student will see the same.
MESSAGING STUDENTS
You have the ability to message students using the ‘Chat’ icon in the bottom left. If you are teaching a lesson and your next student enters the waiting room, you will get a notification, and if needed, you can message them by clicking the ‘Chat’ icon, and selecting that students name. The student will see the message while they are in the waiting room.
(Student view):

SAVING / EXPORTING LESSON BOARD
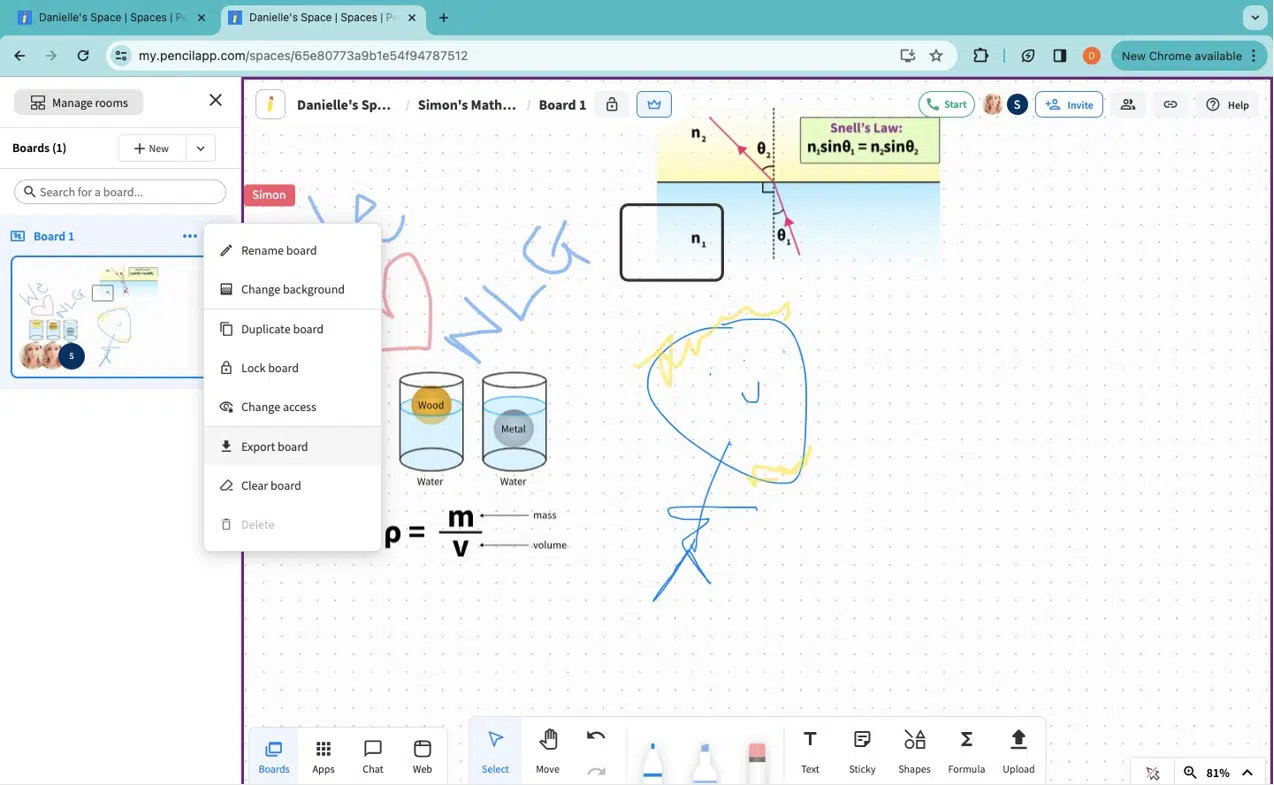
If you like, you can save the board from the lesson as a PNG file. This means you can send to the student, load as an image for the next lesson, or save it as reference. To do this, after you have ended the call (Step 8), click the ‘Boards’ icon at the bottom of the screen, click the 2 dots next to the lesson board name, then click ‘Export board.’ This will save the board image as a .PNG file on your computer in your Downloads.
(Student view):
RESOURCES
Please familiarise yourself with the ‘Apps’ icon (bottom left of lesson screen). Here you will find all sorts of resources, images, icons you can drop on the board and much more.
You can use the search box to find relevant apps and information – if you are using software such as reading eggs, Active Learn, MyMaths etc, search for them, drop them onto the board, and after logging in, you can use the resources with the student, who will also be able to interact with it (unless you turn on ‘Leader Mode’ as above).
There are many more features and things will you will be able to do, so please attend one of our tutor drop in sessions over the next few weeks to learn, share ideas and find out how other NLG tutors have been using the new platform.
Please remember, this is phase 1 of our new software, which will be rolled our over the coming months. Everything we are doing is done to reduce your admin time, increase lesson quality, and make the overall experience better for both you and your students.
As always, thank you for all your hard work.